Some
preliminary thoughts on digiscoping [January 2004]
all photos & text by Don Roberson
After reading many on-line digiscoping articles, and corresponding
with a variety of digiscoping practitioners, I got a rather inexpensive
digital camera for Christmas 2003 to try this photographic outlet. I've
done film photography for 3 decades with some success as an amateur, but
I've never attempted to reach professional levels in either equipment or
results. I have, however, been very impressed by the near professional
results of some digiscopers in the last couple of years. This page is created
within a week of trying out this concept, to present some things that had
to be worked out early in the game and as a way to look back later on just
how naive I was.....
In my research I found that there were essentially two types of current
digiscoping:
-
type 1: Handholding the camera to the scope to take advantage of the 20-30X
power of the scope, and using the digiscoping primarily as a means of documenting
interesting birds. The advantages are that one just goes birding with the
scope, and can photograph something interesting quickly but pulling the
camera out of one's pocket. The emphasis remains on birding. Most any type
of digital camera can work for this type of digiscoping, but a lighter
weight camera makes handheld photos easier. Disadvantages include the inevitable
camera shake when handholding, which means images will not be as crisp
as professional photographers require.
-
type 2: Connecting the camera to the scope and using digiscoping primarily
as a means of photography. This turns the scope into a powerful telephoto
lens. The advantages over "type 1" include the fact that the images are
crisper and sharper because there is no shake (handheld shots always have
some hand shake); one can compose shots better; and one can make shots
even crisper yet by using a shutter release. The disadvantage is that one
is basically engaging in photography rather than birding, or, if one is
out birding with their scope and finds something to photograph, it takes
a lot longer to set up the shot because you has to connect the camera first.
The bird is more likely to fly away than in "type 1" digiscoping.
I already had a Leica Televid APO 77 telescope with a straight-through
20X60 zoom eyepiece. To do "type 1" digiscoping I needed only a 3 megapixel
or greater digital camera, and there is a huge choice of those out there.
Many of them have designs that have the lens telescope out from the camera,
and the optical zoom extends or pulls in the lens. One can deal with this
lens movement while digiscoping in "type 1" but if the lens is connecting
to the camera, an internal focusing lens becomes a necessity. So for "type
2" digiscoping, one is almost forced to go with a Nikon CoolPix 990, 995
or 4500 (but not most newer models or other Coopix; some Coolpix do not
have the internally focusing lens). These have internally focusing lens;
connecting adapters are possible because there is threading at the base
of the lens (many, many other digital cameras do not have treads); and
there are a wide array of accessories possible. But what if I didn't like
this type of digiscoping? Plus, things are changing so rapidly in the digital
camera field that much better equipment may be available next year for
less money.
 It
is my opinion at this stage that one must choose which "type" of digiscoping
you want to do. One is not necessarily "better" than the other, but you
have to decide whether (a) you want the ability for quick bird shots through
the scope while birding or (b) you want to get good bird photography, including
the ability to print out good quality photos from your printer, from your
digiscoping. I decided that, for the moment, I'd like to try "type 1" digiscoping.
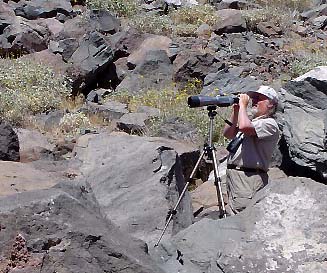
In this shot (right; by Rita Carratello) I'm holding the camera
up to the scope as its wedged in some rocks out in Death Valley.
It
is my opinion at this stage that one must choose which "type" of digiscoping
you want to do. One is not necessarily "better" than the other, but you
have to decide whether (a) you want the ability for quick bird shots through
the scope while birding or (b) you want to get good bird photography, including
the ability to print out good quality photos from your printer, from your
digiscoping. I decided that, for the moment, I'd like to try "type 1" digiscoping.
In this shot (right; by Rita Carratello) I'm holding the camera
up to the scope as its wedged in some rocks out in Death Valley.
For one thing, "type 1" digiscoping was a lot less expensive. Looking
at prices on Amazon.com and on a variety of "compare price" sites, it looked
like a new Coolpix would cost about $400, and the various connectors perhaps
$150, not to mention batteries and storage media cards. It appeared to
me that starting "type 2" digiscoping would cost a minimum of $600. In
contrast, I could pick up a "type 1" digital camera for about $250 at local
stores (e.g., Circuit City, Office Depo) without waiting for something
to arrive by mail. In the end, I bought an Olympus Camedia D-560, 3.2 megapixel
camera, with 3X optical zoom for $220, plus $80 for rechargeable batteries
and storage cards, for a total outlay ($300) of half of what just starting
"type 2" digiscoping would have cost. [Some lower prices are available
through E-Bay, or by buying used equipment, if one accepts those risks.]
As it turns out, the Camedia D-560 has a smaller diameter lens than
the Camedia D-550 that has been successfully used by some (e.g., Joe Morlan).
This means that vignetting is a greater problem. My 20-60x zoom lens on
my scope also produces much more vignetting than would a standard 30x wide-angle
lens. So my new camera is not ideally suited to my scope. Of major importance,
though, is the basic rule to use the scope on its lowest
power (20x in my case) but the camera's optical zoom at its highest
power.
My initial efforts with the camera were very frustrating. But I worked
out some of my problems with Graham Catley's fine article
on the Lincolnshire Bird Club site. Joe Morlan then supplied a very
helpful hint from an Ontario
Field Ornithologists' site that showed how to make a "centering" device
from a spice jar lid. I made one just like shown in that link and found
most of my major problems solved. I can now quickly "center" the camera
over the lens (without touching the scope lens) and see an image quickly.
It takes a bit longer to size the image as desired and to work with the
optical zoom and auto focusing, and then there is a slight delay (half-a-second,
maybe) between snapping the shutter and taking the photo, but the process
is not too onerous. I can still actively use the scope while the "centering"
device is on, or, if I don't want it, it comes on and goes on very, very
quickly.
I've had the camera for one week now. I wanted to create this page while
still in the learning stages. I expect to get better at technique and in
understanding the camera. Here are also some points that were very helpful
to me so far:
-
Ask focused questions. Starting out is quite frustrating but the information
is out there. I joined two digiscoping chat lines [digiscoping
and digi-birds]
and found answers by using the "search" feature of archives;
-
Read other Internet resources; Anne Spence provided a very useful list
that is reproduced at the end of this page;
-
Expect difficulties. For example, I followed all the directions provided
to install the software to download my images to my Macintosh, but I couldn't
get the machine to "read" my camera. I finally called the Olympus 800 customer
support number and spent almost an hour on the phone with them (this service
is an advantage of buying a new camera with a warranty). It turned out
that (a) I had to activate several software programs in my machine that
were not automatically "turned on" and that I would have never learned
about from anything in the materials that came with the camera. In addition,
my camera has to be "on" to download images although all the material says
it is supposed to be "off" to download. Without customer support, I would
have never have figured it out, and I would not have been comfortable downloading
from the "on" position of the camera [customer support said this was okay].
-
Practice, practice, practice. One does get better with practice. And you
simply delete the ones that don't work at no cost!
-
Batteries can be used up quickly, so rechargeables are almost a necessity.
Learn to turn the camera off when not immediately using it, to save batteries.
-
Finally, and this was critical for me, use the scope at low power (e.g.,
20X or 30X) rather than high power (e.g., 60X). I found that all my shots
at 60X or other high power in my scope came out very soft-focused, whether
or not I used the optical zoom in the camera. High power on the scope intensifies
the inevitable hand shake when handholding the camera, so much so that
in my case, I cannot compensate for it. All my acceptable photos so far
have been at low power with the scope, and then using the optical zoom
feature of the camera (up to 3X; this can translate into an effective 60X
photo) to increase the magnification and reduce vignetting.
Following are some shots that illustrate some variations I have found so
far. They also illustrate some of the limitations of hand-held digiscoping
with my particular camera and my particular scope. It is probable that
other combinations of cameras and scopes would have less vignetting than
does mine, but I also illustrate here how I've attempting to minimize this
problem.
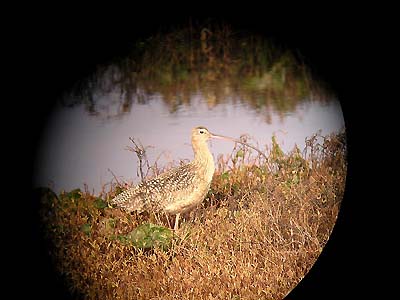 |
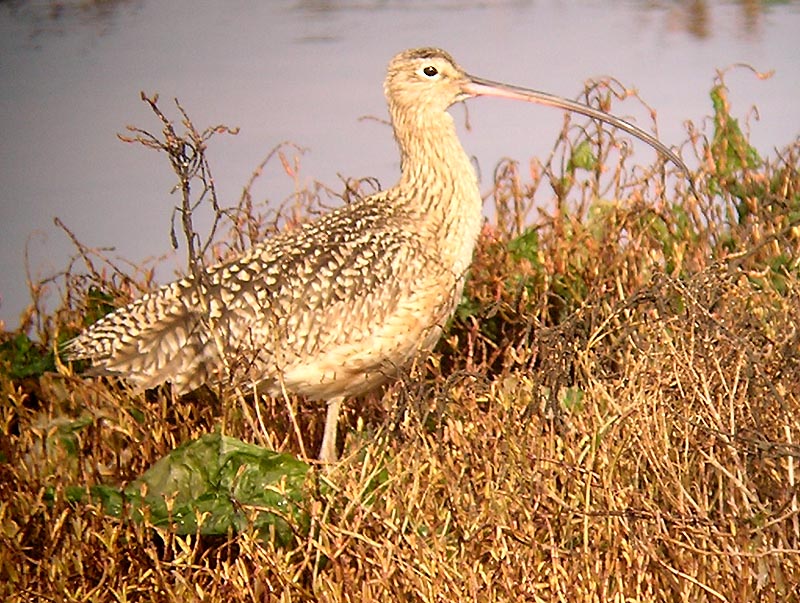
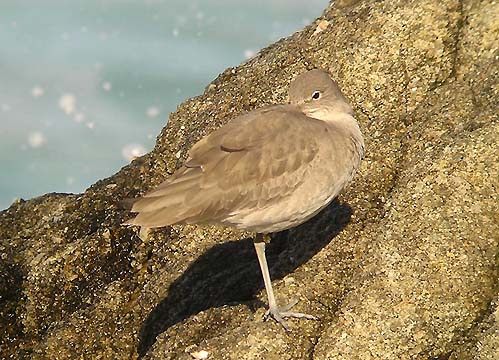
This Long-billed Curlew is taken handheld at 1x power (no optical zoom);
there is complete vignetting but a crisp image in center of scope. |
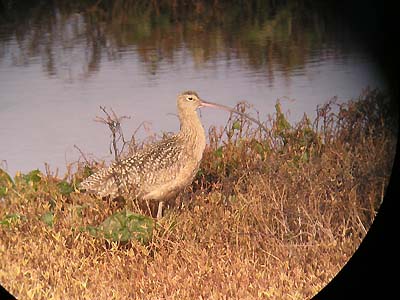 |
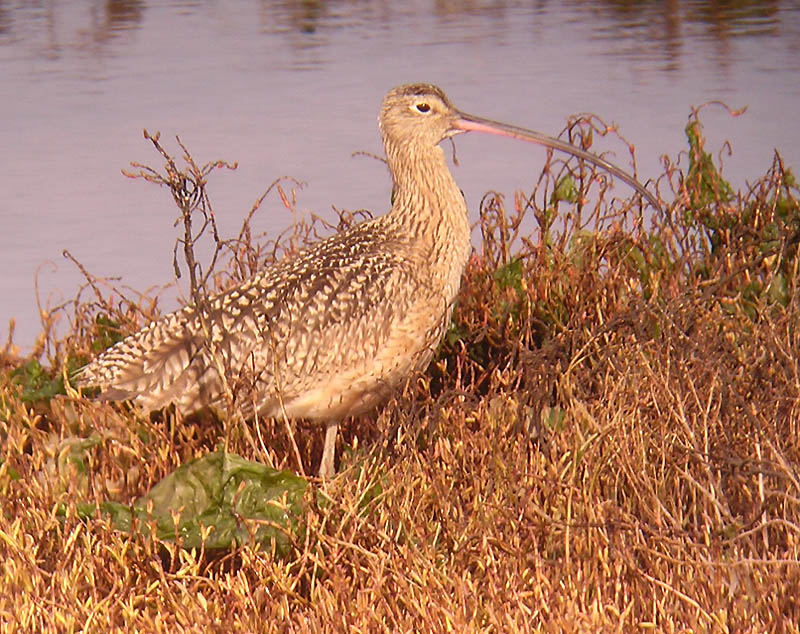
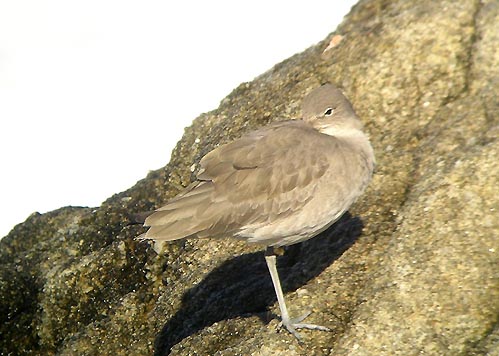
The same curlew handheld at 2x optical zoom; vignetting is reduced
to corners only. |
 |
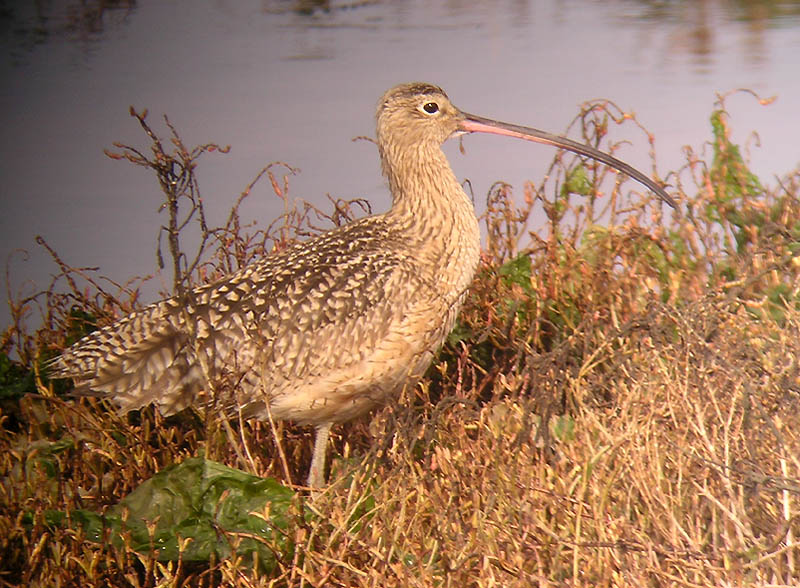
The same curlew handheld at 3X optical zoom (maximum zoom); no black
vignetting but optical vignetting at upper left and probably lower left
corners (darkening of the image). |
I then took each of the photos above and worked on the images in PhotoShop®,
including cropping, unsharp mask and/or sharpen edges, and image balancing
techniques (various color or contrast balancing). The results are shown
below in the same order (1x but cropped; then 2x and cropped; and finally
3x with minimal crop) at full size (e.g, about 800 pixels wide):
To my eye, these look like perfectly adequate digiscoping but slightly
soft, and I attribute this to the fact each is handheld and (possibly)
the result of a very lightweight tripod. I understand that crisper photos
can be obtained by using a heavier tripod, or (in "type 2" digiscoping)
by attaching the camera to the scope and using a shutter release to minimize
camera shake. Whether this degree of softness is acceptable is a personal
choice. I consider it about the same as my handheld film photography, all
of which would be better if on a tripod and better yet with shutter release.
It is a question of trade-offs; a professional photographer would not be
content with either these digital images nor my film images. But the purpose
of my photography is personal enjoyment, documenting the event, and an
ability to share the images with others, all while having photography minimally
interfere with birding. More expensive, heavier, and bulkier equipment
can significantly lessen the enjoyment of the day in the field. Again,
it is simply a personal choice. These images are sufficient to discuss
in detail the individual feather patterns which is a reason I wanted
to have a digiscoping option. Of these three photos, I think the best crispness
came with the 3x optical zoom.
In addition to showing these comparisons of different levels of optical
zoom on the overall quality of the photographs, I have already noted that
the optical zooms produce slightly different colors. I believe this is
a function of the built-in light meter and how much of the image it is
measuring to produce the automatic light balance. Consider these three
shots, taken moments apart. These have been cropped and sharpened, but
no color balancing was performed:
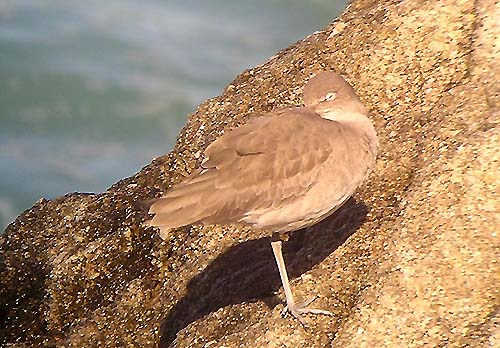 |
This sleeping Willet was taken at 1x (no zoom) and then was cropped
significantly in PhotoShop®: the overall color is on the warm, brownish
side. |
 |
In this 2x shot (about mid-level optical zoom), cropping was still
necessary to delete vignetting, but the color is cooler and probably truer. |
 |
In this 3x (maximum zoom) shot, the color is much cooler and grayer
(possibly too much?) but the depth of field is smaller and the rock is
quickly out-of-focus. It is possible the background of the sea (upper left)
is white and not blue because of the foam from a crashing wave. |
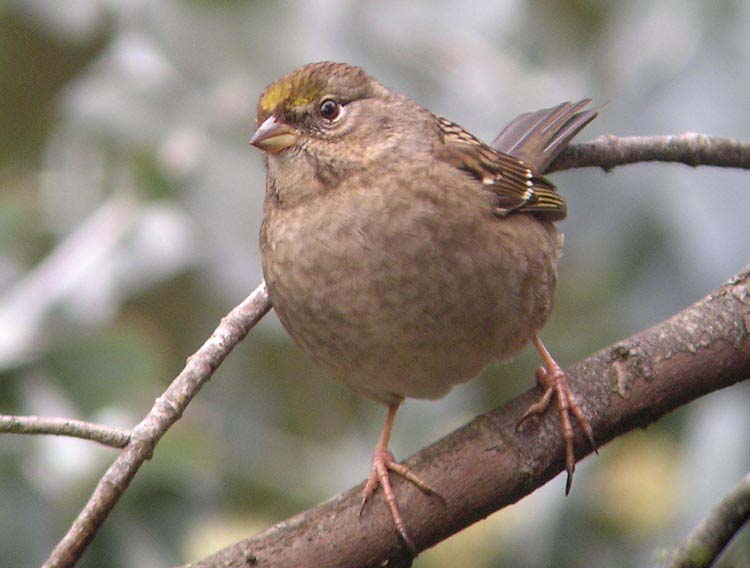
Finally, I also tried some landbirds at my feeder at much closer range
than these waders. The bird's image almost fills the frame of the scope,
so I found that I had to use some degree of optical zoom to keep the whole
image within the non-vignetted part of the frame. Here is an example of
a Golden-crowned Sparrow. It appears to my eye that this is about as crisp
as one could hope for from my set-up with a hand-held camera. I am impressed
with the depth of field that even allows the tail to be somewhat in-focus:
Anne Spence provided this list of web sites with digiscoping information:
http://www.digibird.com/whatisdir/whatis.htm
http://www.md.ucl.ac.be/peca/test/a.html
http://www.laurencepoh.com/
http://www.shortcourses.com/how/digiscoping/digiscoping.htm
I wish to thank those who corresponding with me on this topic: Graham Catley,
Alvaro Jaramillo, Kevin McKereghan, Joe Morlan, and Anne Spence. In addition,
Anne Spence brought her album of digital photos to a Christmas Bird Count
for me to peruse, and this was very helpful. I also benefited from information
in the on-line commentary on the chat lines referenced above, and in various
articles, both recently in Birding magazine and on-line.
All photos & text © 2004 Don Roberson; all rights reserved.
TOP
TO HOME PAGE
TO CREAGRUS
CALIFORNIA LIST PORTAL PAGE
TO BIRD FAMILIES
OF THE WORLD
Page created 2 Jan 2004